
Email cannot be empty
Password cannot be empty
Email format error
Email cannot be empty
Email already exists
6-20 characters(letters plus numbers only)
The password is inconsistent
Email format error
Email cannot be empty
Email does not exist
6-20 characters(letters plus numbers only)
The password is inconsistent


Behind the Stick: The Science and Process of Making Hot Melt Adhesive
We encounter them in countless everyday items—from the sturdy soles of our shoes and the neatly packaged boxes on our doorstep to the pages of the books we read. Hot melt adhesives (HMAs) are the unsung heroes of modern manufacturing and craft. But have you ever stopped to wonder how that solid, inert glue stick is transformed into a powerful, instant bond?
The journey from raw materials to the final product is a fascinating blend of chemistry and precision engineering. Let's pull back the curtain on how hot melt adhesives are made.
The Core Ingredients: A Simple yet Sophisticated Recipe
At its heart, a hot melt adhesive is a 100% solid thermoplastic material. It becomes a liquid when heated and solidifies upon cooling, creating a strong bond. The typical formula consists of three key components:
-
Polymers (The Backbone): This is the primary component that provides the adhesive strength and internal cohesion (tack). Common polymers include:
-
EVA (Ethylene-Vinyl Acetate): The workhorse of the industry, known for its excellent adhesion to a wide range of materials like wood, paper, and plastic.
-
Polyolefins (e.g., APAO, PE): Often used for more specialized applications requiring higher heat resistance or flexibility.
-
Polyamides and Polyesters: Offer superior performance for demanding applications like automotive or electronics, with excellent heat and chemical resistance.
-
-
Tackifiers (The "Sticky" Agents): While polymers are strong, they often lack initial "stickiness." Tackifiers are resinous materials added to enhance wetting ability on surfaces, improve adhesion, and adjust the open time (the time you have to assemble parts before the adhesive sets).
-
Waxes (The Modifiers): Waxes control the viscosity of the molten adhesive, making it easier to pump and apply. They also influence the set time (how fast it solidifies) and the final hardness of the adhesive.
-
Stabilizers and Additives (The Protectors): A small but crucial part of the recipe, antioxidants and stabilizers are added to prevent the polymer from degrading due to heat and oxidation during both production and application. Other additives may include plasticizers for flexibility or pigments for color.
The Production Process: A Carefully Controlled Fusion
Producing hot melt adhesive is a batch process that requires precise temperature control and mixing. Here’s a step-by-step look inside a typical production plant:
Step 1: Weighing and Loading
The first step is all about accuracy. The raw materials—polymer pellets, solid tackifier resins, and wax blocks—are carefully weighed according to the specific formulation. Consistency is key; even a slight deviation can alter the final product's performance.
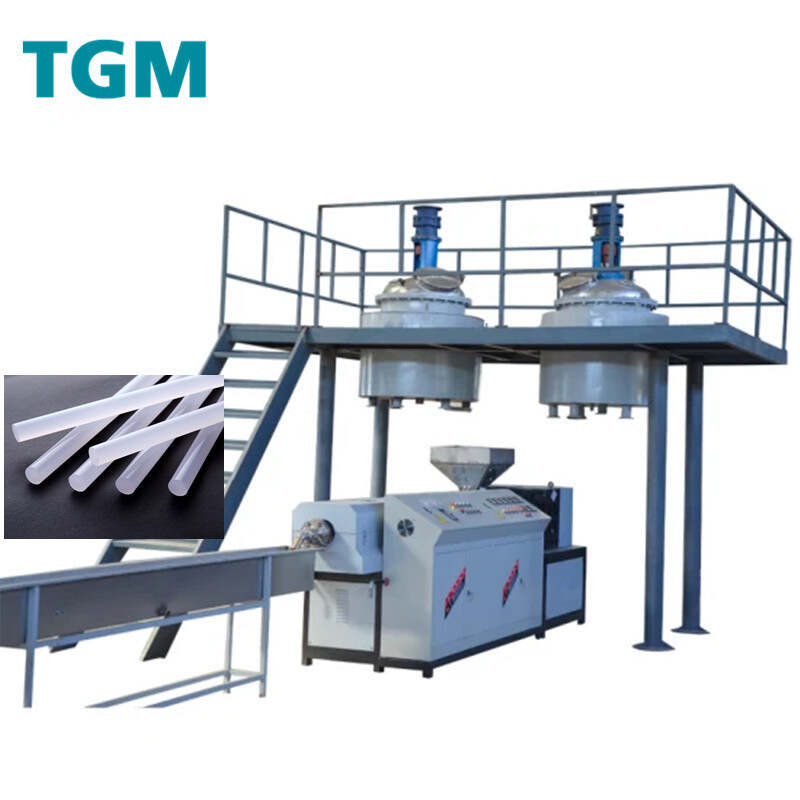
Step 2: Melting and Mixing
The weighed ingredients are fed into a large, heated reactor vessel, often called a sigma blade mixer. This is the heart of the operation.
-
Heating: The vessel is heated, typically using oil or electric jackets, to a temperature well above the melting points of all components (usually between 120°C and 200°C / 250°F and 390°F).
-
Agitation: Powerful blades knead and mix the melting ingredients vigorously. This ensures a completely homogeneous and uniform mixture, where every polymer chain is evenly coated with tackifier and wax.
Step 3: De-aeration and Filtration
As the materials melt and mix, air can become trapped, forming bubbles. The molten mass may be placed under a vacuum to remove these air pockets, ensuring a dense, consistent final product. For high-purity applications, the melt may also be passed through a filter to remove any unmelted particles or contaminants.
Step 4: Forming the Final Product
Once the molten adhesive is perfectly mixed and degassed, it's ready to be shaped. The method depends on the intended use:
-
Underwater Pelletizing: The hot melt is extruded through a die plate and cut into small pellets. The pellets are instantly cooled and solidified in a water bath, then dried. This form is ideal for bulk handling and large-scale industrial applicators.
-
Extrusion and Cooling: The melt is extruded through a die to form continuous shapes, most commonly glue sticks for handheld glue guns. The continuous strand is conveyed through a cooling bath or cooling tunnel, where it solidifies.
-
Slab or Block Molding: For large-scale applications like carton sealing, the adhesive is poured into large molds or onto a cooling conveyor to form slabs or blocks weighing several kilograms.
Step 5: Packaging and Quality Control
The cooled pellets, sticks, or blocks are automatically packaged. But before they leave the factory, samples from each batch undergo rigorous quality control (QC) testing. Technicians check for critical properties like:
-
Melt Flow Index (Viscosity)
-
Softening Point
-
Tack and Adhesion Strength
-
Open Time and Set Time
Only after passing these stringent tests is the batch approved for shipment.
More Than Just a Glue Stick
The next time you use a hot glue gun for a craft project or receive a securely sealed package, you'll appreciate the sophisticated science and meticulous manufacturing process that went into that simple stick of glue. It's a perfect example of how chemistry and engineering come together to create a product that, quite literally, holds our world together.