
Email cannot be empty
Password cannot be empty
Email format error
Email cannot be empty
Email already exists
6-20 characters(letters plus numbers only)
The password is inconsistent
Email format error
Email cannot be empty
Email does not exist
6-20 characters(letters plus numbers only)
The password is inconsistent

Behind the Shine: A Look into the Production of Enamel Paint
Enamel paint is renowned for its hard, glossy, and durable finish, making it a top choice for everything from industrial machinery and automotive parts to household furniture and DIY crafts. But have you ever wondered how this versatile coating is made? The journey from raw materials to the can in your hand is a precise science. Let’s step inside the factory and explore the fascinating production process of enamel paint.
The Core Ingredients
Before production begins, it's crucial to understand the key components that make up enamel paint:
-
Pigments: These fine, solid particles provide the color, opacity, and hiding power. They can be inorganic (like titanium dioxide for white) or organic (for vibrant colors).
-
Binder (Resin): This is the heart of the paint. It forms the continuous film that binds the pigments together and adheres them to the surface. Common binders for enamels include alkyd (for oil-based), acrylic (for water-based), and polyurethane resins.
-
Solvents: These liquids dissolve the binder and adjust the paint's viscosity, making it easy to apply. The type defines the paint:
-
Oil-Based Enamels: Use organic solvents like mineral spirits or white spirit.
-
Water-Based (Acrylic) Enamels: Use water as the primary solvent.
-
-
Additives: These are specialty chemicals added in small amounts to impart specific properties. Examples include:
-
Driers: Accelerate the drying process (common in oil-based enamels).
-
Anti-settling Agents: Prevent pigments from clumping and settling at the bottom of the can.
-
Flow & Leveling Agents: Ensure a smooth, even finish without brush marks.
-
UV Stabilizers: Protect the color from fading in sunlight.
-
The Manufacturing Process: A Step-by-Step Journey
The production of enamel paint is a multi-stage process that emphasizes precision and consistency.
Stage 1: Pre-Mixing and Dispersion
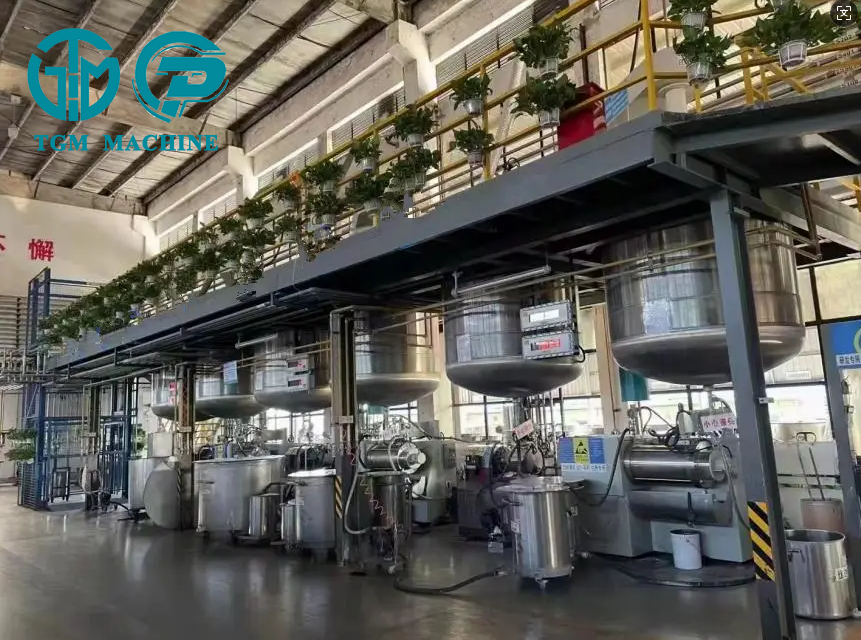
The journey begins in a high-speed dispersion tank. The precise amounts of solvent (or water), resins, and additives are loaded first. Then, the pigments and fillers are gradually added. A powerful mixer with a circular toothed blade, called a disperser, rotates at high speed. This creates intense shear forces, breaking down pigment agglomerates and wetting each particle with the resin solution. The result is a thick, pasty mixture known as a mill base.
Stage 2: Grinding (Milling)
The pre-mixed mill base often still contains fine pigment clusters. To achieve the perfectly smooth finish enamel is known for, this paste must be ground even finer. It is pumped through a series of mills. Common types include:
-
Sand Mill (Bead Mill): The mill base is passed through a chamber filled with tiny glass or ceramic beads. The intense agitation between these beads grinds the pigment particles down to a microscopic and uniform size.
-
Ball Mill: A large rotating cylinder filled with steel or porcelain balls that tumble and grind the paste over several hours.
This step is critical. The finer the grind, the smoother the final gloss and better the hiding power of the paint.
Stage 3: Let-Down (Thinning & Mixing)
The finely ground paste is now transferred to a larger mixing tank called a let-down tank. Here, the remaining portion of the resin and solvent is added to "thin down" the concentrated paste to its final consistency. This is also the stage where any final additives, such as driers or specialty chemicals, are carefully incorporated. The mixture is stirred slowly but thoroughly to ensure complete homogeneity without introducing air bubbles.
Stage 4: Quality Control (QC) Testing
Before packaging, a sample from the batch is rigorously tested. QC labs check for:
-
Viscosity: Is the thickness correct for application?
-
Color: Does it match the standard exactly?
-
Density / Weight per Gallon: Ensures formula accuracy.
-
Drying Time: Tested on metal panels.
-
Gloss Level: Measured with a gloss meter.
-
Fineness of Grind: Checked using a Hegman gauge to ensure no large particles remain.
Any batch that fails to meet specifications is adjusted or rejected.
Stage 5: Filtration and Packaging
Once the batch is approved, it is pumped through fine filters (e.g., bag filters) to capture any last impurities or oversized particles. The pristine, finished paint is then automatically filled into cans, lids are sealed, labels are applied, and the cans are packed into boxes for shipping.
The Key Difference: Oil-Based vs. Water-Based Production
While the core process is similar, the production of water-based acrylic enamels requires special consideration:
-
Equipment: Must be made of stainless steel to resist corrosion, as water can rust ordinary carbon steel tanks.
-
Additives: Require different additives to stabilize the emulsion, control foam (from mixing), and ensure proper film formation without the use of powerful organic solvents.
Conclusion
The production of enamel paint is a brilliant blend of chemistry and engineering. It’s a process designed to transform raw, disparate ingredients into a perfectly consistent, high-performance product. Every can represents a commitment to quality control and a deep understanding of how materials interact. The next time you open a can of that smooth, glossy enamel, you'll appreciate the complex and precise journey it took to get there.